
Paint defects plague even experienced automotive refinishing professionals, compromising vehicle appearance and customer satisfaction. Whether you're tackling swirl marks, orange peel, or deep scratches, understanding the correct removal processes reduces defect rates significantly. This comprehensive guide walks you through identifying common defects, selecting appropriate tools, executing multi-stage correction techniques, and verifying results while preserving critical clearcoat thickness. You'll gain practical frameworks for addressing everything from surface imperfections to deep paint failures, ensuring consistent, professional outcomes across all refinishing projects.
Table of Contents
- Key takeaways
- Understanding common paint defects and their causes
- Preparing for paint defect removal: tools, safety, and measurement
- Executing the paint defect removal process step by step
- Verifying results and maintaining finish longevity
- Explore quality abrasives and polishing tools for paint correction
- Frequently asked questions
Key Takeaways
| Point | Details |
|---|---|
| Multi stage polishing | A standard multi stage correction approach is essential to remove common defects such as swirl marks and orange peel while preserving clearcoat integrity. |
| Tool choice by defect | Different tools suit varying defect severity and operator skill, enabling efficient removal without overworking the clearcoat. |
| Preserve clearcoat thickness | Preserving clearcoat thickness through careful planning and measurement is central to achieving durable results. |
| Standardisation matters | Standardisation of surface preparation, product mixing, application techniques and environmental controls dramatically reduces defect rates. |
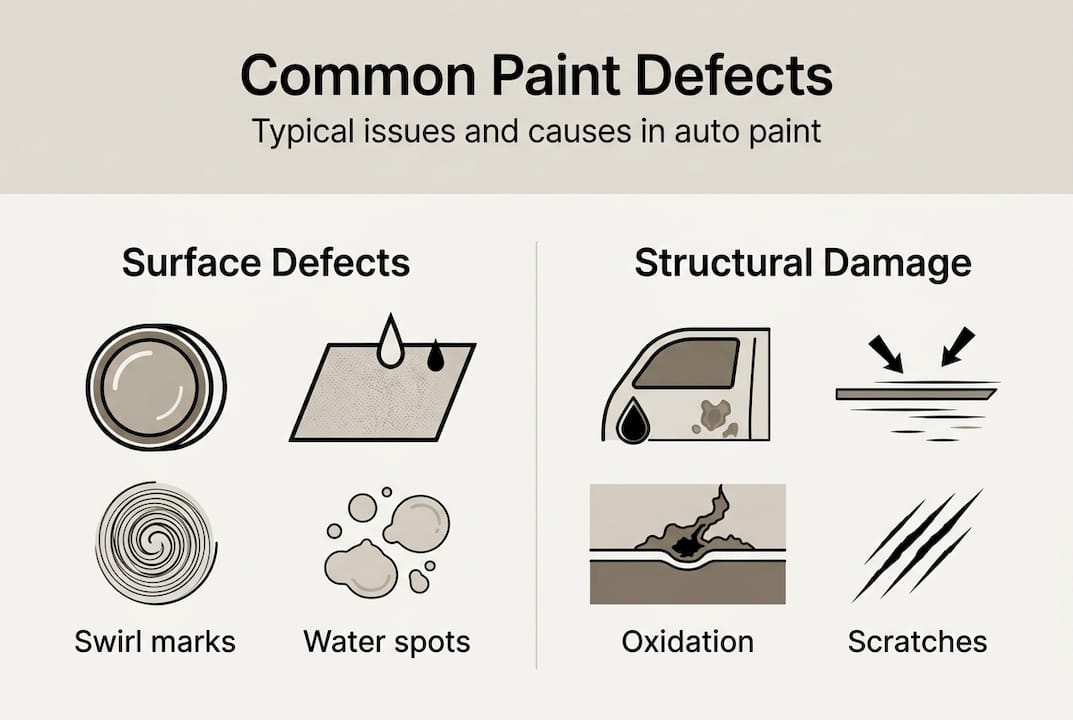
Understanding common paint defects and their causes
Identifying paint defects accurately determines your entire correction strategy. Common defects include swirls, orange peel, fish eyes, runs, peeling, water spots, and oxidation with each requiring specific treatment approaches. Swirl marks appear as circular scratches from improper washing or polishing techniques. Orange peel creates an uneven texture resembling citrus skin, typically from improper spray technique or environmental contamination during application. Fish eyes manifest as small circular craters in wet paint caused by silicone or oil contamination on the surface.
Defect occurrence stems from five root causes captured in the 4M1E framework: man (operator error), machine (equipment malfunction), material (product quality issues), method (incorrect procedures), and environment (temperature, humidity, contamination). Understanding these causes helps prevent future defects whilst addressing current ones. For instance, runs and sags result from excessive material application or inadequate flash time between coats. Peeling indicates adhesion failure between paint layers, often caused by inadequate surface preparation or incompatible products.
Standardisation dramatically reduces defect rates in professional refinishing operations. Establishing consistent procedures for surface preparation, product mixing ratios, application techniques, and environmental controls minimises variability. Document your processes and train team members thoroughly to maintain quality across all projects.
"Defect prevention through standardised processes saves significantly more time and material than correction work, making upfront investment in proper technique essential for profitable operations."
Water spots and oxidation represent environmental damage rather than application defects. Water spots etch into clearcoat when mineral deposits dry on hot surfaces. Oxidation dulls paint through UV exposure breaking down chemical bonds in clearcoat. Both require mechanical correction to restore gloss and clarity.
Preparing for paint defect removal: tools, safety, and measurement
Proper preparation separates successful correction from clearcoat disasters. Assemble essential tools before starting: dual action (DA) or rotary polisher, backing plates sized for your pads, foam pads in cutting, polishing, and finishing grades, microfibre applicators and towels, various grit sandpapers (80-3000), wet sanding blocks, paint thickness gauge (PTG), panel prep spray, compounds and polishes in heavy, medium, and fine grades, masking tape, and appropriate personal protective equipment.
| Tool Category | Specific Items | Purpose |
|---|---|---|
| Measurement | Paint thickness gauge, LED inspection light | Monitor clearcoat removal, verify correction |
| Polishing | DA polisher, rotary polisher, backing plates | Mechanical defect removal |
| Pads | Cutting (firm), polishing (medium), finishing (soft) | Progressive correction stages |
| Abrasives | 80-400 grit dry, 800-3000 wet sandpaper | Deep defect levelling |
| Chemicals | Heavy/medium/fine compounds, panel prep, clay lubricant | Surface correction and preparation |
Work exclusively in shaded areas or indoors to prevent rapid product drying and heat buildup. Direct sunlight accelerates chemical evaporation and increases surface temperature, risking clearcoat damage through excessive friction heat. Monitor panel temperature throughout correction, stopping immediately if surfaces become too hot to comfortably touch.
Surface preparation determines correction effectiveness. Start with thorough washing using pH-neutral automotive shampoo to remove loose contamination. Follow with chemical decontamination using iron removers and tar dissolvers for bonded contaminants. Clay bar treatment removes remaining embedded particles that would scratch during polishing. Use generous clay lubricant and work in small sections, kneading the clay frequently to expose clean surfaces.
Measuring paint thickness before correction prevents catastrophic clearcoat breakthrough. Take readings at multiple points across each panel, noting thinner areas around edges and body lines. Record baseline measurements to calculate removal during correction. This data guides your pad and compound choices, determining whether aggressive cutting or gentle polishing suits the available clearcoat thickness.
Pro Tip: Always perform test spots on inconspicuous areas before full panel correction. Apply your planned process to a 30cm square section, measuring thickness before and after. This preview reveals actual correction results and clearcoat removal rates, allowing process adjustments before committing to visible surfaces. Test spots prevent costly mistakes and build confidence in your approach.
Decontaminate soft polishing pads before use by washing with pad cleaning solution. New pads often contain manufacturing residues that reduce cutting ability and introduce contamination. Clean pads between compounds to prevent cross-contamination that diminishes correction effectiveness.
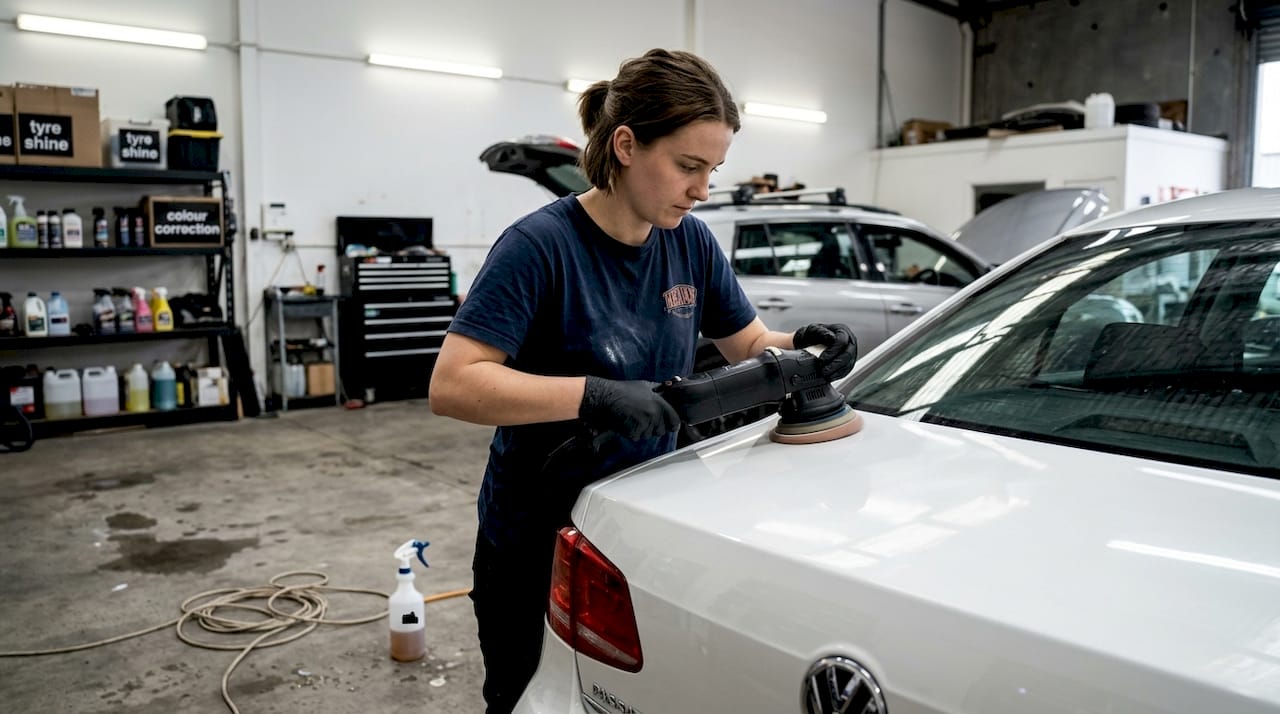
Executing the paint defect removal process step by step
Multi-stage polishing addresses surface defects systematically through progressive refinement. This standard approach removes defects whilst minimising clearcoat loss and eliminating correction marks from previous stages.
-
Heavy cut compounding removes severe swirls, scratches, and oxidation using firm cutting pads with aggressive compounds. Apply compound to the pad, spread at low speed, then work at moderate speed (1200-1500 RPM for DA) using overlapping passes with medium pressure. Work 60cm x 60cm sections completely before moving forward.
-
Medium polishing eliminates haze and micro-marring from heavy cutting using medium cut polishing pads with less aggressive compounds. Reduce pressure compared to cutting stage, allowing the pad and product to perform the work. This stage restores initial gloss whilst removing correction marks.
-
Fine polishing refines surface to maximum clarity using soft finishing pads with ultra-fine polishes. Minimal pressure and moderate speeds (1000-1200 RPM) produce hologram-free, mirror-like finishes. Multiple light passes outperform fewer heavy passes at this stage.
-
Final finishing applies glaze or sealant using dedicated finishing pads at low speeds (800-1000 RPM). This step maximises depth and gloss whilst providing initial protection for corrected surfaces.
Standard correction processes follow this progression with tool and pad adjustments based on defect severity and paint hardness. Soft paints require less aggressive combinations, whilst hard clearcoats need firmer pads and stronger compounds to achieve correction.
| Polisher Type | Advantages | Disadvantages | Best Applications |
|---|---|---|---|
| Dual Action (DA) | Safer for beginners, minimal heat buildup, forgiving operation | Slower correction, less effective on hard paints | Light to moderate defects, soft paints, large panels |
| Rotary | Faster correction, effective on hard paints, maximum cutting power | Heat buildup risk, holograms without proper technique, steep learning curve | Severe defects, hard clearcoats, experienced operators only |
Deep defects including peeling, bubbling, and scratches penetrating clearcoat require sanding and refinishing rather than polishing alone. Start by sanding loose or damaged paint using dry sanding sheets beginning at 80-120 grit to remove compromised material. Progress through 180, 240, 320, and 400 grit, feathering edges 5-8cm beyond the damaged area to create smooth transitions preventing visible repair edges.
Clean sanded areas thoroughly with wax and grease remover, wiping in one direction with clean microfibre towels. Apply thin primer coats allowing proper flash time (5-10 minutes between coats depending on product specifications and temperature). Build coverage gradually rather than applying heavy single coats that risk runs and sags.
After primer cures, wet sand with 800-1000 grit to level the surface, then apply basecoat in light, even passes maintaining consistent distance and speed. Allow adequate flash time between basecoat layers. Finish with clearcoat application, again using thin multiple coats rather than heavy single applications.
Pro Tip: Flash time between coats dramatically affects final finish quality. Insufficient flash time traps solvents causing defects, whilst excessive waiting allows contamination. Follow product technical data sheets precisely, adjusting for temperature and humidity. Use your finger to lightly touch masked areas; properly flashed coats feel dry to touch but show slight tack.
Wet sand cured clearcoat starting at 1500 grit, progressing through 2000, 2500, and 3000 grit with constant water lubrication. This levels the refinished area flush with surrounding original paint. Follow wet sanding with the standard multi-stage polishing process described above to restore full gloss.
Verifying results and maintaining finish longevity
Verification ensures correction meets quality standards before final delivery. Use panel prep spray or isopropyl alcohol wipes to remove polishing oils revealing true surface condition. These products strip temporary fillers and oils that mask incomplete correction, showing actual defect removal. Inspect under bright LED lighting at multiple angles, as defects invisible under overhead lighting become obvious in angled light.
Repeat paint thickness measurements at the same locations measured during preparation. Calculate actual clearcoat removal by comparing before and after readings. Safe removal ranges 6-10 microns per full correction, with OEM clearcoat typically measuring 35-70 microns. Document remaining thickness to inform future correction decisions and communicate limits to customers.
Edge cases require modified approaches to prevent damage. Thin factory paint (below 100 microns total) limits aggressive correction options. Measure thoroughly and consider wet sanding with ultra-fine grits (2000-3000) followed by gentle polishing rather than heavy compounding. Metallic and pearl finishes show mottling if corrected too aggressively, as uneven clearcoat removal creates varying light refraction through effect pigments. Use lighter pressure and finer compounds on these finishes.
Repainted panels often have thicker clearcoat than factory finishes, but quality varies significantly. Previous repairs may have insufficient clearcoat thickness or poor adhesion. Always measure repainted areas separately and perform test spots before committing to full correction.
Maintaining corrected finishes extends effectiveness and protects your work:
- Apply quality sealant or coating immediately after correction to protect exposed clearcoat from environmental damage
- Educate customers on proper washing techniques using pH-neutral products, microfibre wash mitts, and two-bucket methods
- Recommend regular maintenance washes (every 2-4 weeks) to prevent contamination bonding that requires clay treatment
- Advise against automatic car washes using harsh chemicals and abrasive brushes that reintroduce swirls
- Suggest covered parking or quality car covers for vehicles stored outdoors to minimise UV exposure and environmental fallout
Pro Tip: Photograph corrected panels immediately after completion under consistent lighting conditions. These images provide valuable documentation for customer records and serve as references for future work. Include paint thickness readings in your documentation to track correction history and plan future services appropriately.
Quality fine polishing pads and proper maintenance products significantly impact finish longevity. Invest in professional-grade materials rather than consumer products to deliver results that maintain appearance between correction services. Regular follow-up with customers about finish condition builds relationships and generates repeat business whilst ensuring your correction work continues performing as intended.
Explore quality abrasives and polishing tools for paint correction
Successful paint defect removal depends on quality tools matched to professional requirements. SPX Abrasives supplies precision-engineered abrasives specifically designed for automotive refinishing applications, ensuring consistent performance across all correction stages. Our ceramic sanding sheets 120-600 grit deliver superior cutting action with extended life, reducing material costs whilst maintaining aggressive stock removal for deep defect repair.

Professional medium maroon polishing pads provide the perfect balance between cutting ability and finish refinement for standard correction work. Our complete range covers every correction stage from heavy compounding through final finishing, with guaranteed quality and reliable supply supporting your workshop operations. Browse our full catalogue to equip your operation with dependable abrasives that deliver consistent results project after project. For bulk orders and trade pricing, submit a wholesale abrasives request to access competitive rates on the materials your business relies on daily.
Frequently asked questions
How do I identify the type of paint defect on a vehicle?
Examine defects under bright lighting at multiple angles, noting texture, depth, and location patterns. Use tactile testing by running your fingernail across suspected defects; raised edges indicate dirt or contamination, whilst valleys suggest scratches or etching. Swirls appear as circular patterns most visible under direct light, orange peel feels textured to touch, and fish eyes show as circular depressions in paint surface. Water spots appear as ring-shaped marks or cloudy areas, whilst oxidation manifests as dull, chalky surfaces that don't reflect light cleanly.
What are the safest polishing tools for beginners?
Dual action polishers provide the safest entry point for paint correction with minimal risk of heat damage or holograms during the learning process. Their oscillating and rotating motion distributes heat effectively whilst the forced rotation prevents the operator from stalling the pad, which causes paint damage. Start with soft to medium pads and less aggressive compounds, gradually progressing to firmer combinations as you develop technique and confidence. Rotary polishers offer faster correction but require substantial experience to avoid burning through clearcoat or creating holograms that require additional correction.
How often can paint be safely corrected without damage?
Safe removal is 6-10 microns per correction, with typical vehicles supporting 2-5 full corrections over their lifetime depending on original clearcoat thickness. Always measure paint thickness before correction to calculate remaining clearcoat and determine whether sufficient material exists for planned work. Panels with previous repairs, edge areas, or thin factory application may support fewer corrections. Maintaining detailed service records including thickness measurements helps track correction history and prevents excessive material removal that compromises paint system integrity and leads to premature failure.
What is the best approach for repairing peeling or bubbling paint?
Progressive sanding from 80-2000 grit removes damaged material whilst feathering edges for smooth transitions. Clean thoroughly with wax and grease remover, then apply thin primer coats with proper flash time between layers. After primer cures, wet sand smooth and apply basecoat in light passes, again respecting flash times. Finish with multiple thin clearcoat applications rather than heavy single coats. Once cured, wet sand the refinished area with 1500-3000 grit progression, then polish using standard multi-stage correction to blend the repair seamlessly with surrounding original finish.